The modern landscape of personal audio is dominated by the convenience of true wireless stereo (TWS) earbuds. For users entrenched in the Samsung ecosystem, the Galaxy Buds line—ranging from the original Buds and Buds+ to the Buds Live, Buds2, and the high-fidelity Buds2 Pro—offers an unrivaled level of integration, seamless switching, and intuitive features.
This guide provides a comprehensive roadmap for maximizing your experience. We will explore the precise Galaxy Buds setup process across different devices, dive into the nuanced configurations via the companion app, and offer robust, unique solutions to the most frustrating connection errors and common user complaints.
1. Initial Galaxy Buds Setup: The “Seamless” Experience
Samsung designed the Galaxy Buds to be incredibly easy to pair with their own devices. The cornerstone of this ease is the Galaxy Wearable app and the proprietary ‘Seamless Connection’ feature.
Step-by-Step Guide for Samsung Devices (Android)
For users with a modern Samsung Galaxy smartphone or tablet, the initial connection is designed to be almost magical.
The Process:
-
Preparation: Ensure your Samsung device is unlocked, connected to Wi-Fi or mobile data, and that Bluetooth is enabled.
-
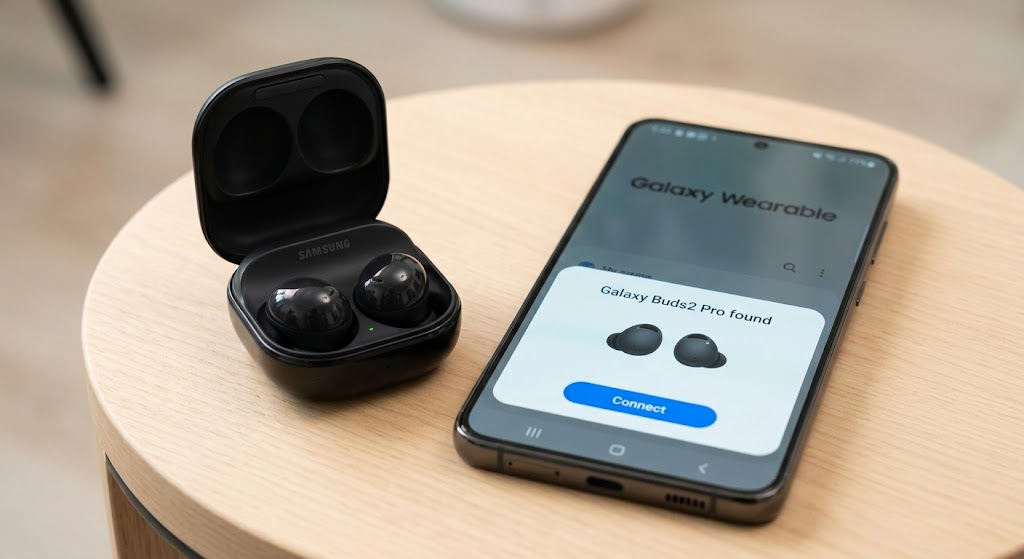
Activate Pairing: Take your Galaxy Buds charging case. Open the lid of the case. Crucially, leave the earbuds sitting inside the case.
-
The Pop-up: Within a few seconds, a pop-up window should automatically appear on your phone’s screen. It will show an image of the specific model of Buds you have (e.g., “Galaxy Buds2 Pro found”).
-
Connect: Tap the “Connect” button in the pop-up.
-
Galaxy Wearable Integration: The phone will automatically launch the Galaxy Wearable app (or prompt you to download/update it). It may request several permissions—grant these to ensure all features work correctly.
-
Setup Complete: Follow any on-screen tutorials within the app, and your Buds are ready to use.
This seamless process works across multiple Samsung devices registered to the same Samsung Account. The Buds will now automatically connect to whichever device you are actively using.
2. Setting Up Galaxy Buds on Non-Samsung Devices (Android, iOS, PC)
While the pop-up pairing is exclusive to Samsung devices, Galaxy Buds function as standard Bluetooth earbuds with almost any host device. However, you will miss out on features like advanced EQ customization (on iOS) and the proprietary seamless switching.
General Bluetooth Pairing (Android and iOS)
-
Place in Case: Put the earbuds back into the charging case and keep the lid open.
-
Enter Manual Pairing Mode: There are two ways to do this, depending on the model:
-
Method A (Newer Buds): While the Buds are inside the open case, simultaneously touch and hold the touchpads on both earbuds for 3 seconds. The battery indicator light inside the case will flash red, green, and blue, indicating pairing mode is active.
-
Method B (If Method A fails): Take the Buds out of the case, place them in your ears, and then press and hold both touchpads until you hear a series of beeps indicating pairing mode.
-
-
Host Device Search: Go to Settings > Bluetooth on your host device (e.g., Pixel 7 or iPhone 13).
-
Select Buds: Scan for available devices. When “Galaxy Buds [Your Model]” appears in the list, tap it to pair.
Crucial App Note for iPhone (iOS) Users: Samsung developed a dedicated “Samsung Galaxy Buds” app for iOS, but it only supports the older Galaxy Buds+ and Galaxy Buds Live. Owners of the newer Buds2 or Buds2 Pro cannot customize settings, update firmware, or change touch controls via an official iPhone app. These users must connect to an Android device (even temporarily) to adjust critical settings before returning to iOS.
Connecting to a Windows PC or Mac
-
Enter Pairing Mode: Use Method A (pressing the pads inside the open case) to activate the flashing multi-color light.
-
On Windows: Go to Settings > Devices > Bluetooth & other devices. Click “Add Bluetooth or other device”, then select “Bluetooth.” Choose your Buds from the list.
-
On Mac: Go to System Preferences > Bluetooth. When your Buds appear, click “Connect.”
3. Advanced Configuration: Mastering the Galaxy Wearable App
Once the Galaxy Buds setup is complete, the Galaxy Wearable app is where the magic happens. Navigating this menu properly is key to personalizing your audio.
Essential Settings to Review Immediately
-
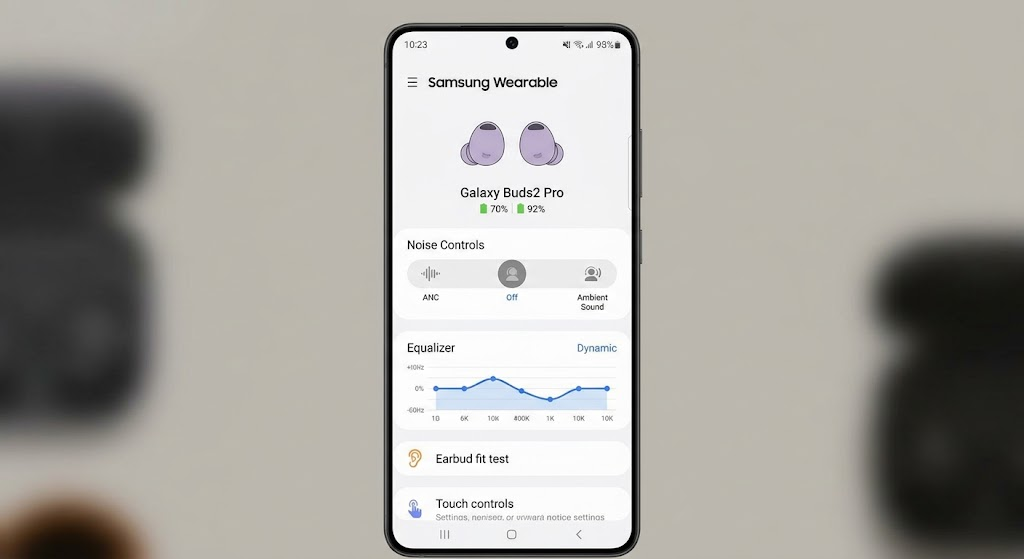
Noise Controls: Access the three primary modes: Active Noise Cancellation (ANC), Off, and Ambient Sound.
-
Ambient Sound Customization: (If supported by your model, e.g., Buds2 Pro) You can adjust how loud ambient noise is amplified, and even enable “Voice Detect.” This feature uses the Buds’ microphones to detect your voice and automatically switch from ANC to Ambient Sound so you can have a conversation without removing an earbud.
-
Equalizer (EQ): The preset EQ options are surprisingly effective. The default “Normal” is balanced, but “Dynamic” often provides the most engaging sound. Use “Bass Boost” sparingly.
-
Touch Controls: This is the most frequented menu. By default, tapping does standard actions (Play/Pause, Next/Previous). The most important setting here is customizing the “Touch and hold” action (usually for switching between ANC and Ambient, or activating a voice assistant).
-
Labs: This menu often contains experimental or upcoming features. For example, some models include “Gaming Mode” here, which minimizes audio latency for competitive play.
-
Accessibility: This includes essential controls for balancing audio between the left and right earbud, which can be critical for hearing health.
Firmware Updates: The Setup’s Final Step
Your Galaxy Buds setup isn’t truly complete until you ensure they are running the latest software. Updates often fix stability bugs and sometimes improve ANC performance or sound quality. Check Earbuds settings > Earbuds software update within the Wearable app.
4. Troubleshooting: The Most Persistent Galaxy Buds Connection Issues and Solutions
Even with the best technology, errors happen. This section addresses the most frequent frustrations related to Galaxy Buds connection and setup, providing unique troubleshooting steps.
Issue 1: One Earbud (Usually Left) Fails to Connect or Charges Unreliably
This is arguably the #1 user complaint. One bud connects and works fine, while the other remains inactive or dead.
The Diagnosis: This is almost always caused by a poor physical connection between the charging pins in the case and the charging contacts on the earbud.
The Unique Solution: Extreme Contact Hygiene
-
Don’t Just Wipe: Use a cotton swab (Q-tip) lightly dampened with 70% Isopropyl Alcohol (IPA).
-
Scrub (Gently): Don’t just wipe the contacts on the earbud. You must carefully scrub the recessed charging pins inside the case. Dirt, sweat, and earwax oxidize these connections.
-
The “Re-seat”: Place the problematic bud into the case. While it’s there, gently press down on it and wiggle it slightly. Watch the charging LED inside the case; if it flickers red/green, the connection is intermittent. Keep cleaning until it holds a solid red light (charging).
Issue 2: Constant Audio Dropouts (Intermittent Disconnection)
The Buds pair successfully, but the audio cuts in and out repeatedly, or there is severe latency (lag).
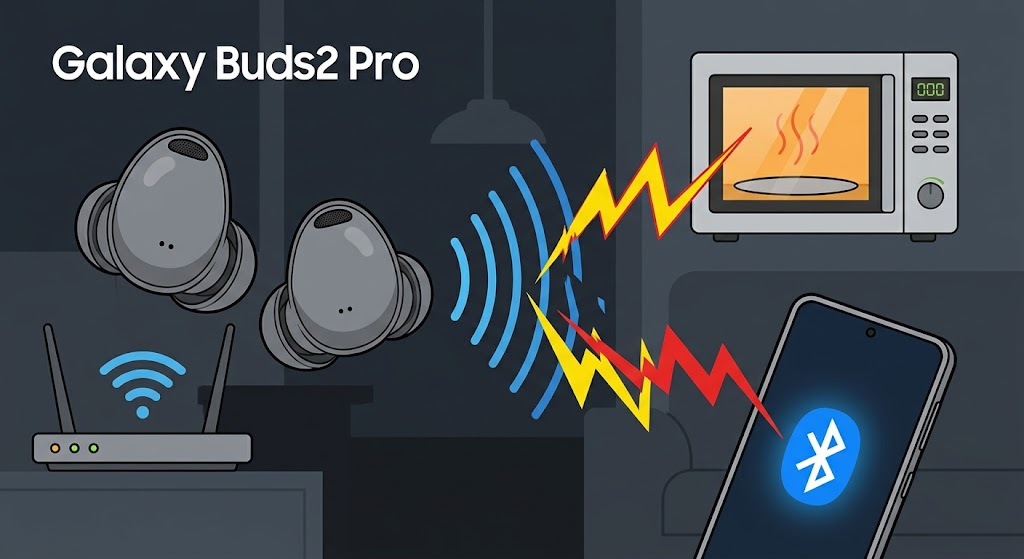
The Diagnosis: This is typically Bluetooth interference (RF congestion) or a software conflict rather than hardware failure.
The Unique Solution: The BT Interference Audit and Reset
-
The Environment Audit: If you are using your Buds near other 2.4GHz wireless devices (Wi-Fi routers, other Bluetooth devices, or even microwaves), the signal can degrade. Move away from potential sources of interference.
-
Reset Network Settings: On your phone, navigate to Settings > General Management > Reset > Reset network settings. (Note: This will erase all your saved Wi-Fi passwords). Re-pair your Buds afterward. This clears out deep-seated software conflicts related to wireless communication.
Issue 3: “Device Not Found” During Initial Setup (The Pop-up Fails)
You open the case next to your modern Samsung phone, and… nothing happens.
The Unique Solution: The Manual Sync and “Nearby Device” Check
-
Grant Nearby Device Permissions: On your phone, go to Settings > Apps > Galaxy Wearable > Permissions. Crucially, ensure that the “Nearby devices” permission is explicitly set to “Allow.” Without this, the app cannot scan for new BLE (Bluetooth Low Energy) beacon signals.
-
Force Manual Sync: Place both Buds in the case and keep the lid open. With the phone screen unlocked and nearby, perform the manual pairing mode trigger: touch and hold both touchpads for 3 seconds until the inner case LED flashes red/green/blue. This often forces the phone to recognize the pairing attempt and prompt the pop-up.
Note: Earbuds Connection Problems and Solutions
Achieving Wearable Synergy
When the Galaxy Buds setup is executed correctly, and the deep configuration options of the Galaxy Wearable app are mastered, these earbuds offer a sublime user experience. The integration with Samsung devices, especially features like Auto Switch and Voice Detect, is unmatched in the Android ecosystem.
The key to resolving the most persistent errors lies not in frustration, but in understanding the hardware dependencies—specifically the need for pristine physical charging contacts and the environment’s wireless health. By following this guide, you can ensure that your Galaxy Buds remain a seamless extension of your daily audio landscape.